Showing posts with label petit debutant. Show all posts

Wednesday, December 2, 2009

It's here, It's finally here!

Sew Mama Sew's Giveaway Day 2009!


I'm giving away one of my custom Digital Portrait Silhouettes. Like these:


My giveaway is open to international entrants as well!

I'll even give you 2 chances to win!

Post a comment telling me what your favorite Christmas ornament is for one entry.

Follow my blog (or if you already do) and post a second comment telling me you do.

I'll pick a winner on Sunday December 6th!


In case you are wondering, my favorite Christmas ornament is the 2002 Swarovski Annual Christmas ornament.

It was given to us on the year we got married by a very special friend of mine (my German, social studies, and Seminary teacher - all in one!) We then started the tradition of buying that year's ornament every Christmas. We will be getting ornament #8 shortly in the mail. I can't wait to Have my tree decked out with 25, or maybe even 50 ornaments someday! It's just a lovely visual reminder of our time together as a family.


Don't forget to visit Sew Mama Sew for the master list of giveaways!

Friday, November 13, 2009

Giveaway time!

This week I've teamed up with Miss Mustard Seed to give away one of my custom digital silhouettes over on her website. If you haven't been over to Mustard Seed Creations get on over there for some gorgeous furniture makeovers. Be sure to link up any recent furniture or home furnishings makeovers, thrifty finds, favorite furniture pieces, or great furniture arrangements for a chance to win one of my silhouettes.

Miss Mustard Seed's Creative Blog


Here are some of my favorite makeovers she has done {talk about talent!}


I love the blue and dark wood combo of this piece!


Wow! what an awesome hutch!


Go check it out!

Friday, September 25, 2009

Couple Silhouette

I caught some bug and it has been messin' with my system the last few days. I'm talking major sore throat and chills. So I haven't done much crafting, cleaning or cooking!

I did manage to get through the six lessons in the EQ6 manual and now have a pretty good idea of what the program can and can't do. I find that it is a pretty intuitive program if you are familiar with any other photo editing or illustrating software. Anyone who is computer illiterate will breeze through the lessons because every step is illustrated!

Besides trugging along through the EQ6 manual I've been working on a few silhouette orders I recently received. My favorite of which was this lovely couple:


It was a fun challenge to wok with the umbrella in the original image. I absolutely love the way it turned out.

My silhouettes are currently on sale and would make a great gift for that hard to please person on your Christmas list! You can see the many options in My Store.

Monday, August 17, 2009

SALE!

My single person Profile Silhouettes are available for $12 from Monday through Friday of this week (regular price $15). You can visit my Etsy shop to purchase them or visit my Flickr gallery for examples of my work.

Friday, June 26, 2009

Getting Settled

It's taken me almost 2 weeks but I have finally made progress in the office/sewing room. That's not to say I'm completely set up yet, but I do have all of my computers (most of which are having issues) set up. I have started the process of transferring all my precious files to the new laptop. This is very slow going folks. Especially as I try to get my work files (mostly profile silhouettes, about 90% of the ones I have made.) For some reason the Dell laptop they are on is being super slow - make that "super duper." It takes about a 1/2 hour for it to get started and is really slow starting any operation. I think it might be the hard drive.

For the moment I'm just grateful it has decided to turn on for me one more time! I've slowly been transferring my files using jump drives. It's working very slowly, but it is working nonetheless.

Anyway, I have re-opened my shop and have already had 2 sales! I'll share my first project with you. Isn't she lovely?

I recently met a university professor who teaches Graphic design. We had a long conversation about geeky things like Photoshop, Illustrator, art styles and such. Actually I rather enjoyed myself since it was the first time since I left college that I got to have a work related conversation with a peer, I'm a STAHM (stay at home mom) remember? It was great to see my husband sitting there with nothing to say because for once the conversation was about "my" work and not "his" work.

Anyway, back to the point of the conversation. We got around to talking about my Etsy shop and I told him about all the silhouettes I have been creating for my lovely customers. He then asked a bunch of questions so I'll share my answers with you as well.

I use Illustrator to create all of the silhouettes. I use the basic pen tool and not the fancy outline tool that finds the edges of a subject, but from what the professor was telling me it's very choppy. I'm actually running Illustrator 11.0 so it doesn't have the fancy tool available, honestly I hadn't even heard of it. I just go in and use the pen tool to create lots of (sometimes hundreds) individual curves that then make up the entire image. Then I add in the desired text, transport it into Photoshop, create my jpgs and email the finished product to my customer.

That's my whole process. Now you know my trade secrets!

Wednesday, May 6, 2009

Kawaii Cupcake pattern

In honor of "Cupcake Week" going on at Lolly's I decided to share one of my own patterns form my stash. I drew up this little gal ages ago and she has been sitting patiently in the cupboard of my "c:" drive. So here she is along with her sisters in PDF format for you to download.

Feel free to use this little pattern for embroidery, applique, needlework, punch needle etc. Just remember that is is for your own personal use on items for yourself or to give away, but not on items for sale. Please do not redistribute my work and claim it as your own.

Add your own flair by adding, sprinkles, candles, changing up the eyes etc. Oh and don't forget to add your finished item over to the Petit Flickr pool!

Wednesday, April 29, 2009

DQS6 Finished and received

I was so excited to finish my DQS6 quilt today. The icing on the cake was receiving my very own DQS6 quilt from Quiltinkimie. I have no idea what she had in mind for her first attempt but I love the fun cheery summer colors in this quilt!


Here is the cute cow box I got in the mail today. It was packed with loads of goodies for me and my kiddos: chocolate, stickers, pencils, a pattern, a needle card, ribbon, a cranberry brownie mix (drooling just thinking about it!) and of course my Doll quilt!
Over on our flickr group we were "challenged" to take a picture of ourselves with our quilt that we made and the one we received. Since hubby was not around I had "Big Brother" take my picture! Not bad for a 5 year old!

Ok so there were quite a few frames he had to take before we got to an acceptable one!


Ah, that's better! Moi, with my bright and cheery DQS6

And Finally a picture of my completed DQS6: "Butterfly Beauty" Again, taken by my little guy!

Saturday, February 7, 2009

Love Birds Embroidery

I spent yesterday afternoon with a horrible migraine. So after I took some excedrin (which always makes me feel jittery and weird, but gets rid of my migraines!) I spent the rest of the afternoon and into the evening embroidering. Thanks to my wonderful husband who came home and started on dinner when he realized I had a migraine ( I LOVE you baby!) I was able to finish this last night and I think it turned out lovely!


I think it's destined to become an accent pillow. I can't decide if I should tint it or not. I think I will wait and see how it looks like a pillow. Oh, it measures 8"x6"

Monday, November 17, 2008

Easy Gift: Profile Silhouette

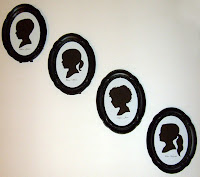
I came up with super simple, inexpensive, and elegant gift idea for Christmas this year. I always struggle with ideas for "grandparent" gifts (gifts for my parents and my husband's parents.) I wanted to do something different than the usual picture of the kids. That's where my web surfing came in handy, I don't remember where or when I saw a wall with hanging profiles. Apparently that image was stored away in my brain somewhere because it recently came back to me while I was trying to decide on Christmas gifts.

These are classy and chic, not to mention timeless! A whole wall dedicated to black and white will look stunning and fit in with any decor. You can change the overall "feel" simply by the frames you choose. I know the grandparents will love them. I'll just have to go and make a set for myself now!

*These would look really cool cut out form patterned scrapbook paper too!*

Supplies:
- side profile photographs
- photo editing software (I'm using Photoshop)
- premium printer paper (or scrapbook paper/cardstock)
- scissors
- fine tip sharpie
- picture frame

1. Take some side profile pictures in front of a wall. You will get a nicer profile if you actually take the time to "do" your subject's hair. You will get a crisper photograph if you choose an area with indirect light.
2. Crop your picture to be just the head and hair... don't forget some neck too!
3. Convert your picture to black and white (grayscale)
4. Play with the levels (photo shop) or the brightness contrast until you get some good crisp lines around the edges of your subject. Don't worry if the cheeks or ears start to fade away. What you want is a crisp outline.
5. Resize your picture to print out as large as possible on a regular sheet of paper.
6. Print your image using the least amount of ink, and black ink only. Trust me you don't want to waste a bunch of ink on this step.
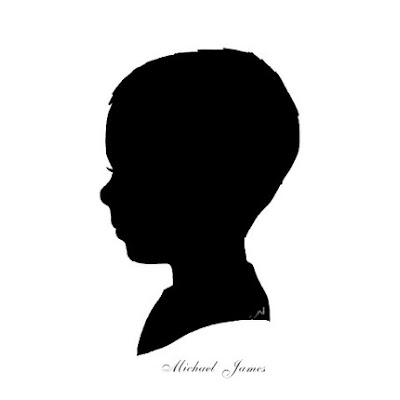
7. Take the sharpie and outline your subject's profile. Go around the details you want. Sometimes you have to improvise sections, like hair, or even simplify them. Don't forget to add the eyelash.
8. Now flip your paper over and look at your outline. Fix any trouble spots on the right side of your picture. Once you are satisfied, trace over your outline with your sharpie, on the back side of your picture, to sharpen your outline. This is where you add the little "swoop" at the cut off point at the bottom of the image.
9. Scan your outline back into your computer (the back side of your picture)
10. Your scanner will pick up some of your photograph through the paper. Play with the brightness/contrast to make the picture crisp.


Here is where you can choose to either continue digitally or you can actually cut out your silhouette form some black scrapbooking paper/cardstock.

Paper:
11. Resize your image to fit withing your frame.
12. Print out your profile and use it as a template for cutting your cardstock

Digital:
11. Make sure your image is a "layer" and not a "background"
12. Use your magic wand and click outside of the profile
13. Now select inverse (shift+ctrl+I)
14. Select your paint bucket tool, set the fill color to black and click inside the profile
15. Before you de-select, take your paintbrush tool(the larger the better) and paint over the edges of the profile to get everything filled in.
16. Resize your image to fit within your frame.
17. Add the name (usually first and middle) in a nice font.
18. Print out your profile (I used hp premium presentation paper) using your "best" setting.
19. You are done! Cut your profile to fit in your frame and frame it!


Of course if you don't want to do this yourself, don't have the time, or don't have the programs, I will gladly do this for you. You can purchase my services through my Etsy shop. For $10 you will get 2 high res digital images (one left and one right facing) in a 5x7 format which you can then print at home or send out to your local photo lab.


* Just another thought! you can print these up small and put them in those ornament frames for your Christmas tree.
* or use the profile to create tile coasters
* make an iron on - for a quilt or pillow
* make a stencil
* make profiles of your pets
* make full body profiles
* use them on personalized greeting cards and stationery

Monday, August 20, 2007

Vintage Re-mix

I love vintage textiles. There is something special about them. I especially like vintage pillowcases. There are many vintage pillowcases that have been hand embroidered with such attention to detail that no machine could ever reproduce.

I'm lucky enough to live in the south where there seems to be an abundance of vintage pillowcases. I've seen them everywhere from flea markets, yard sales, antique shops, and second hand shops. Some are embellished with simple embroidery, others with crochet trims, and some are just spectacular and blow your mind away!

I found a pair of matching pillowcases at a local antique shop and I turned one of them into this beautiful peasant top for a little girl. The embroidery is done by a machine but it was in such wonderful condition that I couldn't resist them.

Here's some tips for buying vintage pillowcases:
- Check for yellowing. Sometimes you can only see these spots in natural light.
- Check for tiny holes
- Check for stains
- Flip the pillowcase inside out and check to see if the embroidery floss is still in good condition.
- Check for fraying threads especially along fold lines.

Have fun browsing and enjoy the art of days gone by.

Wednesday, August 15, 2007

Reversible Pinafores

We've added some reversible pinafores to our shop. We only list a handful (2-5) of each design so if you see one you like snatch it up before someone else does! Here is our latest one, perfect for those memorable pictures to the pumpkin patch! The two pictures are of the same dress. You get 2 looks in one. Visit www.petitdebutant.com to see more pictures of the dress.

Here are some helpful tips to get some great shots at the pumpkin patch:
Take lots of pictures!
Take close-ups as well as distance shots.
Some of the best shots are when the kids aren't even looking at the camera.
Try: holding pumpkins, sitting on bales of hay, surrounding your kids with pumpkins, sitting on the giant pumpkin (if your kids are small enough!)

Most importantly have fun!

Friday, August 3, 2007

New Logo!!

I have been working long and hard to create the logo for Petit Debutant(click the image to see it full size.) It took several weeks to tweak it and get it just right. The great thing about it is that I can change the colors around with the seasons or when I get bored with thte color scheme. Feel free to let me know what you think!