Showing posts with label free. Show all posts

Friday, May 8, 2009

Kitchen Table

Shortly after we got married Mr. Debutant and I inherited a dining room table and 2 chairs from his parents. Mind you this table had been theirs for years and years. Mr. Debutant has years of memories of home cooked meals at this table. I really have no idea how old the table was when we got it, at least 10 years old but I think it was closer to 15-20 (I'll have to ask him later.) Needless to say that while the table was sturdy it was lacking in visual appeal. Mr. Debutant comes from a family of 4 kids, needless to say they took their toll on the table.

So one day about 4 years ago I decided to do something about it, and as it goes with all of my major projects I did it without consulting my husband. My theory behind this is as follows: If I ask or mention that I intend to do something to any piece of furniture that is solid, or solid wood for that matter, Mr. Debutant tends to get all negative on me. He thinks I'll ruin a sturdy item, never mind that it looks like it's been through a garbage disposal. If it's sturdy and solid wood, you don't mess with it. he just doesn't catch my vision. So I've learned to just do my own thing, preferably when he is out of town so he won't interrupt until he sees the final product.

I think he's come around some now. After all he did agree to let me paint our blue kitchen counter tops (see next post.)

Anyway back to the table, I don't think I have any before pictures on this computer so I'll have to search my old hard drive to see if I can scrounge some up. But believe me, I was putting it out of it's misery by giving it new life. I think I've since seen the unfinished top and base at Lowe's (in case you are interested)

So here is the mini tute:
Materials:
1) an old table that has seen better days
2) floor tiles
3) tile/mosaic adhesive (found at Michael's in the mosaic section)
4) decorative gems/half marbles (frosted works better than smooth)
5) spray paint
6)grout
7) some sort of sealant

How to:
1) Do what you like to the base and side edge of the table top, sand paint etc. Don't worry about refinishing the actual top. My table was in decent shape in these areas so I only darkened the wood with a stain.
2) Place all your gems bubble face up on some plastic and spray paint with some paint made for glass. The frosted gems tend to hold the paint better because they are textured. I painted mine black. Allow to dry
3) Once dry glue all your gems (using mosaic glue) to the outer edge of the table top.
4) Break up your floor tiles into pieces ( I left fairly large pieces) You can do this by placing the tile between 2 rags so little pieces don't go flying all over, and then take a couple of good whacks with a hammer.
5) After you've vented all your frustrations on your tile, put the hammer down and step away from the hammer.
6) Now start gluing your tile pieces onto the table top (using the mosaic glue)
7)Once dry mix up your grout (I used black) and apply to the table top just as you would a floor. Clean up the excess. For this step follow the manufacturers directions.
8) allow to dry and seal with some sealant


I must admit I never got to step 8. And my table has done great, with the exception of the little glass marbles. So this last week I went back and re-painted the marbles by hand using a little brush and some black paint.

Table as it looks now

Close up of marbles with peeling paint


Re-painted marbles on the left and old marbles on the right


Monday, November 17, 2008

Easy Gift: Profile Silhouette

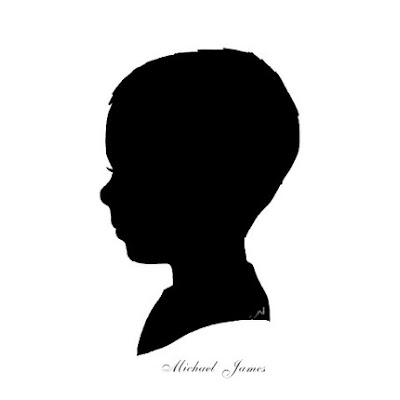
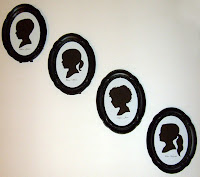
I came up with super simple, inexpensive, and elegant gift idea for Christmas this year. I always struggle with ideas for "grandparent" gifts (gifts for my parents and my husband's parents.) I wanted to do something different than the usual picture of the kids. That's where my web surfing came in handy, I don't remember where or when I saw a wall with hanging profiles. Apparently that image was stored away in my brain somewhere because it recently came back to me while I was trying to decide on Christmas gifts.

These are classy and chic, not to mention timeless! A whole wall dedicated to black and white will look stunning and fit in with any decor. You can change the overall "feel" simply by the frames you choose. I know the grandparents will love them. I'll just have to go and make a set for myself now!

*These would look really cool cut out form patterned scrapbook paper too!*

Supplies:
- side profile photographs
- photo editing software (I'm using Photoshop)
- premium printer paper (or scrapbook paper/cardstock)
- scissors
- fine tip sharpie
- picture frame

1. Take some side profile pictures in front of a wall. You will get a nicer profile if you actually take the time to "do" your subject's hair. You will get a crisper photograph if you choose an area with indirect light.
2. Crop your picture to be just the head and hair... don't forget some neck too!
3. Convert your picture to black and white (grayscale)
4. Play with the levels (photo shop) or the brightness contrast until you get some good crisp lines around the edges of your subject. Don't worry if the cheeks or ears start to fade away. What you want is a crisp outline.
5. Resize your picture to print out as large as possible on a regular sheet of paper.
6. Print your image using the least amount of ink, and black ink only. Trust me you don't want to waste a bunch of ink on this step.
7. Take the sharpie and outline your subject's profile. Go around the details you want. Sometimes you have to improvise sections, like hair, or even simplify them. Don't forget to add the eyelash.
8. Now flip your paper over and look at your outline. Fix any trouble spots on the right side of your picture. Once you are satisfied, trace over your outline with your sharpie, on the back side of your picture, to sharpen your outline. This is where you add the little "swoop" at the cut off point at the bottom of the image.
9. Scan your outline back into your computer (the back side of your picture)
10. Your scanner will pick up some of your photograph through the paper. Play with the brightness/contrast to make the picture crisp.


Here is where you can choose to either continue digitally or you can actually cut out your silhouette form some black scrapbooking paper/cardstock.

Paper:
11. Resize your image to fit withing your frame.
12. Print out your profile and use it as a template for cutting your cardstock

Digital:
11. Make sure your image is a "layer" and not a "background"
12. Use your magic wand and click outside of the profile
13. Now select inverse (shift+ctrl+I)
14. Select your paint bucket tool, set the fill color to black and click inside the profile
15. Before you de-select, take your paintbrush tool(the larger the better) and paint over the edges of the profile to get everything filled in.
16. Resize your image to fit within your frame.
17. Add the name (usually first and middle) in a nice font.
18. Print out your profile (I used hp premium presentation paper) using your "best" setting.
19. You are done! Cut your profile to fit in your frame and frame it!


Of course if you don't want to do this yourself, don't have the time, or don't have the programs, I will gladly do this for you. You can purchase my services through my Etsy shop. For $10 you will get 2 high res digital images (one left and one right facing) in a 5x7 format which you can then print at home or send out to your local photo lab.


* Just another thought! you can print these up small and put them in those ornament frames for your Christmas tree.
* or use the profile to create tile coasters
* make an iron on - for a quilt or pillow
* make a stencil
* make profiles of your pets
* make full body profiles
* use them on personalized greeting cards and stationery

Thursday, November 6, 2008

One Pretty Thing

One Pretty Thing is an awesome website bringing you a daily dose of crafting goodness. Rachel rounds up the best crafting tutorials and inspiration from across the web and posts them all in one place. She showcases lots of different projects such as: sewing, organizing, knitting, jewelry, home decor and so much more! My "to do" list has grown to over 50 projects!

So head on over to One Pretty Thing for your next project.