Showing posts with label tutorial. Show all posts

Thursday, July 1, 2010

Cutest Swiffer on the Block

A while ago (at least a month or two ago) I ran across this ingenious tutorial on Sew Much Ado which resulted in this overly cute Swiffer duster:


I've made 2 and have plans to make more because yes, they are easy to make, yes they work, and yes, they're cute. Plus I don't feel bad since I don't have to throw away one of the store bought replacements every few days since I can throw these in the wash. One word of caution, don't wash these in the same load as anything microfiber. I found out the hard way that said microfiber item will attract every bit of loose thread.


Thursday, June 10, 2010

Basting Tutorial

It seems like everyone has their own method of basting quilts together. I've tried lots of different ways and finally settled on this method which works for me and might work for you.

First I lay down my backing on a nice clean floor (this method will not work on carpet.) Then I tape down newspaper all along the outer edges. I use plain old blue painters tape. Then I "stretch" out and tape down my backing to the newspaper. I use the word "stretch" for lack of a better word. You want the quilt back nice and taught but you don't want to over stretch it or distort it.
Notice my diagonal pieced backing! I've been using John Flynn's method for a few years and I love it. It may be a little confusing at first but it is definitely worth learning to do it to save money on backings. Read more here and here.

Next I lay down my batting on top of my quilt top in the position I want it. I then roll about 1/2 of the batting back (from either side) and apply spray basting in about 12" rows to the quilt back. Then I slowly unroll the batting over the sprayed area smoothing out as I unroll. I then repeat the process until I reach the edge of the quilt. I then roll up the other 1/2 of the batting until I reach the sticky area that I have already spray basted and repeat the process.
I basically do the same thing for the quilt top. I position it, then roll up half of it and then I spray the batting in 12" rows and slowly unroll the quilt top as I go. Repeat for the other half of the quilt top.


I have been using spray basting by June Tailor and have used up one whole can of it and I have one can left. I was able to do several 45x45 quilts with the can as well as several doll quilt sized mini quilts. It is rather expensive at around $9/can but I got mine on clearance long ago for about $4. I don't know if I will buy more of it or try a different brand. I've heard lots of good things about using Aquanet hairspray at around $2/can I'll definitely give that a try! Maybe I can find some coupons to get it for free!

Wednesday, December 2, 2009

Paper Stocking Advent Calendar

I love having an advent calendar in my home. It helps to keep the "is it Christmas tomorrow?" questions to a minimum. I made my little calendar 2-3 years ago and it is one of my favorite things to get out for Christmas. It was super simple to make and looks awesome. I've gotten tons of compliments on my calendar.

Sometimes I display it like a garland on some ribbon, or on a dead tree branch as you can see in the picture below. This picture was taken on Thanksgiving and there it is next to the TV and my little guy. Well it kept falling over and I just couldn't get it to stay put. Usually when I opt to display it like this I put it in a really tall vase then fill the base with those floral gems. Well I apparently left my really tall vase in storage in TN.


I was getting pretty fed up with stockings falling off any time my kids went near it. So I looked around for another idea and realized I had some extra garlands {because I don't have any banisters, or columns in AL, sad} so I strung one up across the living room/dining room cased opening. I then used ornament hooks to hang up each of the little stockings.

{and just so you know we keep it real over here in the PD household I didn't bother to clean up the toys, backpack, or the bag of trash the dog is finding really interesting!}

At first I started to hang up the stockings in numerical order but then I realized that it would look odd half way through the month with stockings on only on half of the garland. So I took them down and then put them back up in a random order. Each little stocking holds 2 little Hershey's Kisses (one for each of my kiddos) and a little slip of paper with an activity to do that day. The activities are little things and things already in our calendar {hey, it's not like my kids know!} such as color Christmas pictures, make gingerbread houses, church Christmas party, and picking up Grandma from the airport.

I'm working on the pattern to post tomorrow so you can make your own stocking calendar. I love advent calendars so if you've got one posted on your blog share the link with me, I'd love to see it.

Friday, April 3, 2009

Painting a door

I found it! My picture was saved to the desktop for easy access and I had forgotten where I put it. This will be more of a tips post rather than a step by step post.


Materials I used:
  • Interior latex paint (white, gloss)
  • Angled brush (I love my Purdy)


Tips:
  • Dust and clean your door first. (I like Simple Green)
  • Paint with the grain of your door ( Sections 1, 5 & 9 were painted with horizontal strokes, the rest were done in vertical strokes)
  • Look at your door and you will see the "sections" already picked out for you
  • Start on the top half of the door ( the numbers indicate the order in which i started painting.
  • As I painted section 1 I also painted to the top of the door (when it is open)
  • As I painted sections 3 & 7 I painted the inside edge of the door (when it is open)
  • Let dry a couple of hours before you come back and decide whether you need another coat. As your door is drying it may look uneven but will look perfect once dry.
I like to use the glossy paint on doors and trims because it stands up to cleaning and it just "pops" and brightens any room. I especially love the effect on a windowsill because the paint seems to reflect the light into the room better.

I do have a more common type of door (with out the curved panels) I'll try and do up another little numbered picture of that door as well. Feel free to ask me any questions!

This week I hope to tackle the french door in the kitchen and maybe even the staircase in the living room!

Monday, November 17, 2008

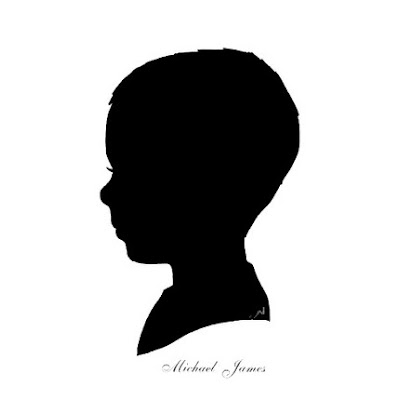
Easy Gift: Profile Silhouette

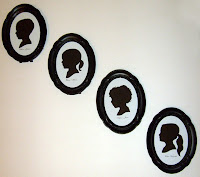
I came up with super simple, inexpensive, and elegant gift idea for Christmas this year. I always struggle with ideas for "grandparent" gifts (gifts for my parents and my husband's parents.) I wanted to do something different than the usual picture of the kids. That's where my web surfing came in handy, I don't remember where or when I saw a wall with hanging profiles. Apparently that image was stored away in my brain somewhere because it recently came back to me while I was trying to decide on Christmas gifts.

These are classy and chic, not to mention timeless! A whole wall dedicated to black and white will look stunning and fit in with any decor. You can change the overall "feel" simply by the frames you choose. I know the grandparents will love them. I'll just have to go and make a set for myself now!

*These would look really cool cut out form patterned scrapbook paper too!*
Supplies:
- side profile photographs
- photo editing software (I'm using Photoshop)
- premium printer paper (or scrapbook paper/cardstock)
- scissors
- fine tip sharpie
- picture frame

1. Take some side profile pictures in front of a wall. You will get a nicer profile if you actually take the time to "do" your subject's hair. You will get a crisper photograph if you choose an area with indirect light.
2. Crop your picture to be just the head and hair... don't forget some neck too!
3. Convert your picture to black and white (grayscale)
4. Play with the levels (photo shop) or the brightness contrast until you get some good crisp lines around the edges of your subject. Don't worry if the cheeks or ears start to fade away. What you want is a crisp outline.
5. Resize your picture to print out as large as possible on a regular sheet of paper.
6. Print your image using the least amount of ink, and black ink only. Trust me you don't want to waste a bunch of ink on this step.
7. Take the sharpie and outline your subject's profile. Go around the details you want. Sometimes you have to improvise sections, like hair, or even simplify them. Don't forget to add the eyelash.
8. Now flip your paper over and look at your outline. Fix any trouble spots on the right side of your picture. Once you are satisfied, trace over your outline with your sharpie, on the back side of your picture, to sharpen your outline. This is where you add the little "swoop" at the cut off point at the bottom of the image.
9. Scan your outline back into your computer (the back side of your picture)
10. Your scanner will pick up some of your photograph through the paper. Play with the brightness/contrast to make the picture crisp.


Here is where you can choose to either continue digitally or you can actually cut out your silhouette form some black scrapbooking paper/cardstock.

Paper:
11. Resize your image to fit withing your frame.
12. Print out your profile and use it as a template for cutting your cardstock

Digital:
11. Make sure your image is a "layer" and not a "background"
12. Use your magic wand and click outside of the profile
13. Now select inverse (shift+ctrl+I)
14. Select your paint bucket tool, set the fill color to black and click inside the profile
15. Before you de-select, take your paintbrush tool(the larger the better) and paint over the edges of the profile to get everything filled in.
16. Resize your image to fit within your frame.
17. Add the name (usually first and middle) in a nice font.
18. Print out your profile (I used hp premium presentation paper) using your "best" setting.
19. You are done! Cut your profile to fit in your frame and frame it!


Of course if you don't want to do this yourself, don't have the time, or don't have the programs, I will gladly do this for you. You can purchase my services through my Etsy shop. For $10 you will get 2 high res digital images (one left and one right facing) in a 5x7 format which you can then print at home or send out to your local photo lab.



* Just another thought! you can print these up small and put them in those ornament frames for your Christmas tree.
* or use the profile to create tile coasters
* make an iron on - for a quilt or pillow
* make a stencil
* make profiles of your pets
* make full body profiles
* use them on personalized greeting cards and stationery

Thursday, November 6, 2008

One Pretty Thing

One Pretty Thing is an awesome website bringing you a daily dose of crafting goodness. Rachel rounds up the best crafting tutorials and inspiration from across the web and posts them all in one place. She showcases lots of different projects such as: sewing, organizing, knitting, jewelry, home decor and so much more! My "to do" list has grown to over 50 projects!

So head on over to One Pretty Thing for your next project.

Friday, October 10, 2008

Organize your Fabric Stash!

As promised here is (the first installment) my Fabric Folding Tutorial (sorry link broken, I have to find my file first so I can upload it again) so that you can get your fabric stash under control! Part one is has instructions for folding cuts of fabrics of 1 yard or more of 42"-44" wide fabric.

You will need:
  • Your fabric
  • Magazine sized (8.5"x11") backer boards - found at your local comic book shop
  • Pins
  • Small scraps of paper for making notes
The backer boards (a.k.a. backing boards, comic storage boards) are typically found in a pack of 100 for about $10-$12. They are usually archival quality and acid free. However they are generally only coated on one side.

Now you might not care as to whether your fabric is protected from touching a non acid free surface, but it will extend the life of your fabric. So will keeping your fabric dust free. There have been arguments to both sides of this dilemma, which I won't go into. I figure that fabric is a pretty expensive hobby at prices of up to $9 a yard or even $15 yard for imported Japanese prints (which I love.) Therefore I choose to use 2 one-sided boards back to back so that my fabric is touching an acid free surface. If you can find, and splurge, the boards that are coated on 2 sides then only use one board. If you don't care about your fabric touching regular card board, then by all means go ahead and use one board. I promise I won't send the fashion police after you!

This is a great way to store fabric on a book shelf, in boxes, or file crates. I love to use the plastic file crates because you can stack them on top of each other, but you can also stack them sideways on top of each other (as long as you use the same brand they'll interlock)

All right, enough chit chat. Here is the tutorial in PDF format. If you choose to print this out make sure your printer is set to "fit to page" or something similar. Let me know if you have any questions (or find any typos.)

Part 2 will be coming soon and will cover folding fabric shorter than 1 yard and fat quarters.

Monday, August 6, 2007

Presser Foot Organizer

About 1 week ago I moved my 2 children into the same bedroom. That left me with an empty room to finally have my own space for sewing. Right now my sewing room is a mess as I try to reorganize everything and get new furniture in there.

Not knowing exactly where to start my mission, I started in my presser foot box. It was just one of those small Rubbermaid type of bins with a lid, about the size of a small box. It starts out with just presser feet in the container but by the end of the month I've got pins, scissors, thread and what not in the box. Plus I always spend 5 minutes searching for the right foot. I had seen a "sewing supply bag" on the Sears website for $30, but I have never actually seen it in the store and looks rather bulky to me. I really like the way the pockets are clear. That's about the only thing I like, so I decided to make my own.

Here are general instructions for making your own presser foot/accessory organizer. Enjoy!


You will need fabric and some vinyl. I used one of those bags you get when you purchase a comforter. for fabric I used some upholstery fabric I had lying around.


Step 1: Lay out all of your presser feet/accessories you want to put in the organizer. Group them by size.

Step 2: Decide how big you want your organizer to be mine measures 7"x30" (add seam allowances.) Hem all edges of your organizer (I used my rolled hem foot)


Step 3: Cut out pieces of the vinyl larger than the size you need, you can always trim it later. Starting at the bottom (with your largest pieces) sew the plastic on. Then sew channels to form more pockets. Pin the plastic often and sew slowly to avoid puckers.

Start sewing at A (back-stitch) go to B, then, C, then D (back-stitch.) Then sew from 1 to 2 and back-stitch at both (Repeat this if you want more channels)


Step 4: Sew the rest of your rows. Make sure you fill the previous row with your presser feet before you determine where to place the next row. This way you can tell how far away to stitch your next row with out having puckers.

Finish it off anyway you want! You can add grommets to the top so you can hang it on your wall, add a magnetic clasp so it stays shut (this is what I plan to do) or tie it with a ribbon. This conveniently fold to about 5"x7" Mine is about 2" thick.


Tuck this baby in with your sewing bag and you're ready for your next class!